Fóruns > Truques e Dicas do Jogo
Passos para resolver quebra-cabeça
por Novel Games
2007-01-25 20:10:42
#1

(Traduzido por Microsoft) Este quebra-cabeça torna-se bastante fácil uma vez que você dominou o básico.
Para facilitar a apresentação, as telhas são nomeadas da seguinte forma:

Você deve terminar o quebra-cabeça de cima para baixo e da esquerda para a direita.
Mover telhas 1 e 2 para suas posições não deve ser um problema:
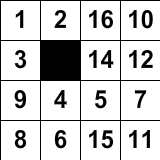
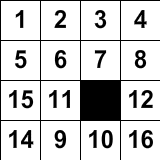
Para as duas últimas telhas da primeira linha, mova a segunda última telha (ladrilho 3) para a posição do último azulejo (posição 4):
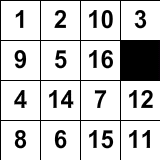
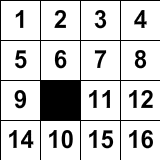
Mova a última telha (ladrilho 4) para a posição abaixo da posição correta:

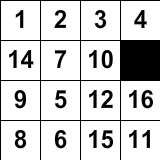
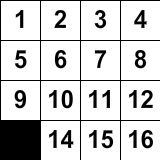
Depois disso, terminar a primeira fila será fácil:
Siga o mesmo procedimento para terminar as linhas restantes até que restem 2 linhas:
Agora termine as demais ladrilhos coluna por coluna, começando pela direita, usando técnicas semelhantes:
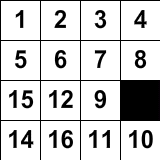
Quando restam apenas 4 telhas, basta girar as telhas e você terá a imagem:
Para facilitar a apresentação, as telhas são nomeadas da seguinte forma:
Você deve terminar o quebra-cabeça de cima para baixo e da esquerda para a direita.
Mover telhas 1 e 2 para suas posições não deve ser um problema:
Para as duas últimas telhas da primeira linha, mova a segunda última telha (ladrilho 3) para a posição do último azulejo (posição 4):
Mova a última telha (ladrilho 4) para a posição abaixo da posição correta:
Depois disso, terminar a primeira fila será fácil:
Siga o mesmo procedimento para terminar as linhas restantes até que restem 2 linhas:
Agora termine as demais ladrilhos coluna por coluna, começando pela direita, usando técnicas semelhantes:
Quando restam apenas 4 telhas, basta girar as telhas e você terá a imagem:
(Original) Steps to Solve Puzzle
This puzzle becomes quite easy once you have mastered the basics.
For ease of presentation, the tiles are named as follows:
You should finish the puzzle from top to bottom and from left to right.
Moving tiles 1 and 2 to their positions shouldn't be a problem:
For the last two tiles in the first row, move the second last tile (tile 3) to the position of the last tile (position 4):
Move the last tile (tile 4) to the position below its correct position:
After that, finishing the first row will be easy:
Follow the same procedure to finish the remaining rows until there are 2 rows left:
Now finish the remaining tiles column by column, starting from the right, using similar techniques:
When there are only 4 tiles left, simply rotate the tiles and you will get the picture:
por Novel Games
2007-01-25 20:10:42
Gosto
Responder